
Introduction to Storyboarding
Storyboarding is a visual method of storytelling used in various industries like film, animation, marketing, education, and even game design. It’s a sequence of illustrations or images displayed in order to visualize a story before actual production begins.
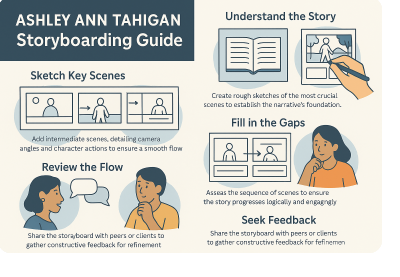
The Ashley Ann Tahigan Storyboard Guide is crafted to help both beginners and professionals master this skill with clarity and confidence.
A storyboard allows creators to plan out every detail — from camera angles to character movement — helping teams communicate better and avoid costly revisions during production.
The Philosophy Behind Ashley Ann Tahigan’s Method
Ashley Ann Tahigan emphasizes three main principles in her storyboard approach:
- Clarity: Every frame should clearly express what’s happening in the scene.
- Simplicity: Avoid clutter and keep only necessary elements in each panel.
- Adaptability: Storyboards should be flexible enough to change based on feedback or creative shifts.
Her guide is not just about drawing; it’s about strategic thinking, visual communication, and storytelling harmony.
Preparing Before You Start Storyboarding
Before picking up your pencil or opening your software, the Ashley Ann Tahigan Storyboard Guide suggests a few essential steps to lay the foundation:
Steps Before Storyboarding:
| Step | Description |
|---|---|
| 1. Read the Script | Understand the plot, characters, and major events. |
| 2. Identify Key Moments | Highlight emotional highs, turning points, and action sequences. |
| 3. Know Your Audience | Define who will see the final product (e.g., kids, professionals, casual viewers). |
| 4. Set Goals | Is it for education, promotion, or entertainment? Your goal will influence your tone. |
These steps ensure that your storyboard aligns with the vision and message of the project.
Crafting a Shot List for the Storyboard
The next step is planning how your scenes will look on screen. This is where you create a shot list — a breakdown of each visual moment.
Some common shot types you’ll use in your storyboard include:
- Wide Shot: Shows the full scene or setting.
- Close-Up: Focuses on a character’s face or important object.
- Over-the-Shoulder: Useful for conversations or reactions.
- POV (Point of View): Shows what a character sees.
The Ashley Ann Tahigan Storyboard Guide also recommends noting camera movements, like pans or zooms, to help bring scenes to life.
Rough Sketches: Thumbnails and Composition
Once your plan is in place, it’s time to start sketching! Ashley encourages the use of thumbnail sketches — small, quick drawings that let you explore different scene arrangements and compositions without investing too much time.
Use these sketches to experiment with:
- Character positions
- Background layout
- Lighting direction
- Focus points in the frame
When it comes to composition, apply techniques like the rule of thirds, framing, and leading lines to guide the viewer’s eye.
Building the Sequence: Organizing Panels
The true power of storyboarding comes in when you sequence your panels. The Ashley Ann Tahigan Storyboard Guide highlights the importance of narrative flow. Your storyboard should guide the audience from one moment to the next naturally, just like watching a movie.
Focus Areas When Organizing Panels:
- Smooth transitions between scenes
- Emotional build-up across sequences
- Timing and pacing to keep attention
- Clear cause-and-effect in actions
Each panel should set up the next — even without audio, someone should understand the storyline by simply looking at your storyboard.
Adding Dialogue and Visual Notes
While visuals speak volumes, sometimes they need support. That’s where dialogue and annotations come in. This is one of the signature parts of the Ashley Ann Tahigan Storyboard Guide.
Under each panel, you can add:
- Character speech bubbles
- Notes on sound effects (e.g., BOOM, Swoosh)
- Music cues or silence
- Camera directions (e.g., zoom in, cut to black)
These additions help editors, directors, and animators understand the full scene’s intention.
Enhancing the Visuals with Details
After the rough sketch and organization come the finishing touches. Now is the time to add:
- Facial expressions
- Detailed backgrounds
- Costumes and props
- Lighting effects
Ashley reminds users not to overdo it. The goal is to communicate, not to create a polished art piece.
Advanced Storyboarding Techniques
If you’re ready to go beyond the basics, Ashley’s guide introduces some advanced techniques:
- Motion Indicators: Use arrows or motion lines to show direction (e.g., a character running).
- Sequential Action: Break a movement into multiple frames to show progression.
- Emotion Through Design: Focus on posture, facial emotions, and shadow play to build feelings.
These help bring your storyboard closer to the cinematic vision in your head.
Best Practices from the Ashley Ann Tahigan Storyboard Guide
Ashley has identified some golden rules over the years. These best practices can make or break a storyboard project:
- Keep it consistent: Reuse character proportions and styles throughout panels.
- Keep it readable: Even a team member seeing your work for the first time should understand it.
- Always prioritize story clarity: Art quality is second to storytelling.
- Use annotations to explain anything that isn’t obvious visually.
Avoiding Common Mistakes
New storyboard artists often fall into the same traps. Ashley’s guide points out the most common errors and how to fix them:
Mistakes & Fixes Table:
| Mistake | Fix |
|---|---|
| Too much detail early | Start with thumbnails first |
| Confusing scenes | Add arrows and notes |
| Ignoring pacing | Use fewer or more panels to control rhythm |
| Not seeking feedback | Show drafts early to your team |
Recommended Tools & Software
Whether you’re a traditional artist or digital designer, Ashley lists a few tools that can make the process smoother:
Recommended Tools:
| Type | Tools |
|---|---|
| Drawing Tablet | Wacom, XP-Pen, iPad Pro |
| Software | Storyboard Pro, Photoshop, Canva, Toon Boom |
| Analog Tools | Pencil, sketchbook, markers |
For beginners, even free tools like Canva offer storyboard templates to get started.
Collaborating and Sharing the Storyboard
In professional settings, storyboards are often reviewed by teams. The Ashley Ann Tahigan Storyboard Guide teaches you how to:
- Label your panels for easy reference
- Keep all files organized in folders
- Use Google Drive, Dropbox, or email for easy access
- Collect feedback using review tools like Frame.io or just simple sticky notes!
Collaboration is key, and Ashley believes a good storyboard is never created in isolation.
Finalizing and Presenting Your Storyboard
Once revisions are done, it’s time to polish your storyboard for presentation. Make sure:
- All panels are clean and clear
- Notes are spelled correctly and easily readable
- Panels follow logical order
- Your final file is in PDF or presentation format
When presenting, walk your team through the flow, explaining key decisions and creative directions. This builds trust and ensures everyone is aligned.
Further Resources to Learn More
Ashley’s guide recommends continued learning through:
Useful Resources:
- Books: “Framed Ink,” “Directing the Story”
- Online Platforms: Skillshare, Udemy, YouTube tutorials
- Communities: Reddit’s r/storyboarding, LinkedIn groups, Discord servers
Connecting with others helps you stay updated, get feedback, and improve faster.
Final Thoughts
The Ashley Ann Tahigan Storyboard Guide is more than a tutorial — it’s a structured path for anyone looking to bring stories to life visually. From understanding scripts to drawing with purpose and presenting like a pro, this guide makes it easy to follow each stage of the storyboard process.
Related Articles
Laptop Review Miracoup – Complete Breakdown of Features, Performance & Value
The Ultimate Guide to Leatheling Game: Story, Gameplay, Features & More
HMH Smart Square Login: Complete Guide to Access, Scheduling, and Workforce Management
How Much 24ot1jxa Is in Product? | Detailed Insights & Safe Use Guide